So far, I have been too lazy to had never seen the need make clarified butter. I mostly used a mixture of olive oil and butter when I wanted to brown something. The butter did burn once in a while when I wasn’t being careful with the heat, but I didn’t really know how to clarify and just didn’t bother. I finally did give it a try, and it turned out to be quite easy and make a huge difference: both easier and better browning! So from now on I will be clarifying butter, and I urge you to not make the same mistake I did and start using it straight away if you aren’t using it already!
So what is clarified butter? Well, butter consists of three parts: milk fat, water, and other stuff usually referred to as ‘milk solids’ (mostly proteins). It’s the butter fat (about 80% of butter) that you want for sauteing. And that is exactly what clarified butter is: butter from which the water and the milk solids have been removed. The water will spatter and the milk solids burn very easily. The smoke point of butter is 160-190C/325-375F, while the smoke point of clarified butter is 250C/480F. Since the Maillard reaction you want for good browning needs at least 150C/300F, it requires precise temperature control to get good browning in butter without burning the butter. With clarified butter it is easy to get good browning.
Clarified butter is closely related to, but not the same as, ghee. Ghee is used in Indian cooking and although sometimes treated as synonyms, ghee has been simmered more than clarified butter and therefore has a darker color and a nutty flavor. In French it is therefore called beurre noisette.
Making clarified butter turned out to be quite easy as long as you make a sizeable batch of at least 500 grams / 4 sticks of butter at once. The three components are separated by density, so you need to be able to separate the layers. It helps a lot if the layers are not extremely thin, so the amount of butter needs to be large relative to the diameter of the pot. So apart from making enough at once, it also helps to use a narrow pot rather than a wide one. The yield is about 75%, i.e. you will yield about 3/4 cup clarified butter from 1 cup butter.
Here’s how to do it.

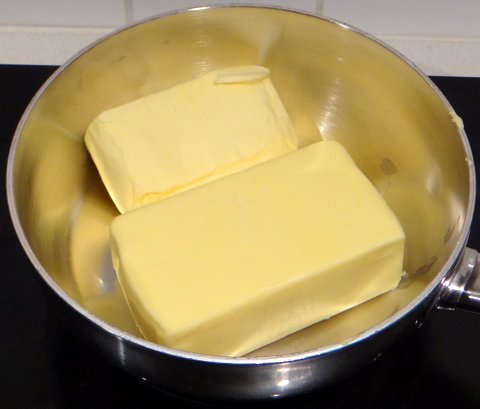
Put the butter (at least 500 grams / 4 sticks) in a heavy-bottomed pot or saucepan.

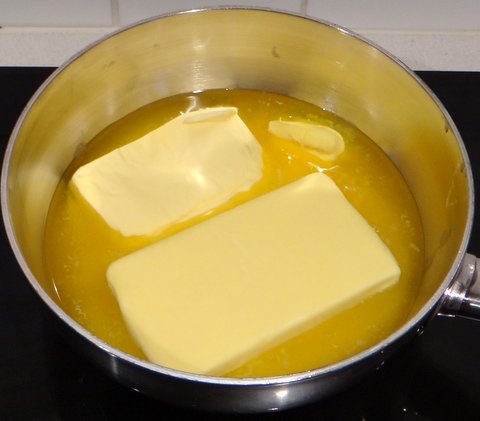
Melt over low heat. Don’t stir, because you want the layers to separate by density. The heat should be so low that all of the butter will melt before the butter on the bottom starts to burn.

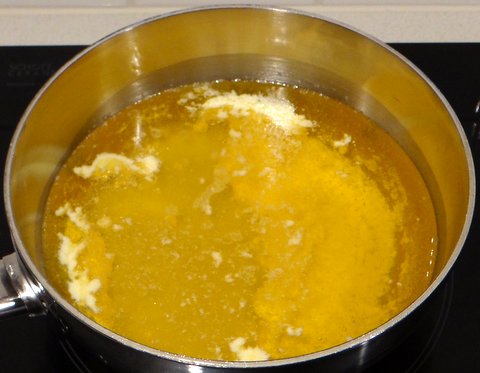
After 10 minutes or so, the butter will have melted and you will see three layers. On top is some foam, that is part of the milk solids. On the bottom will be water with more of the milk solids. In between will be the butter fat that you are after. (To make ghee, simmer until all the water has evaporated.)

Carefully remove the foam on the top with a spoon. (This is easier if you are not trying to take a photo with your other hand at the same time.)

The foam from the top has been removed.

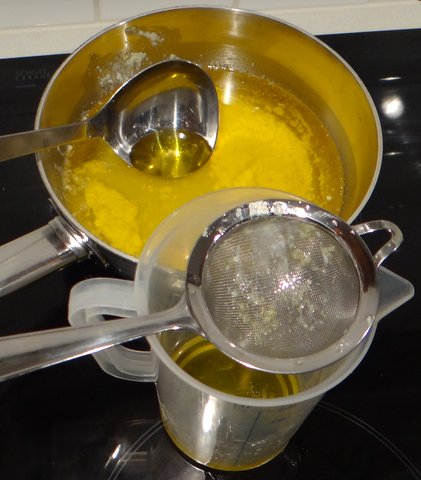
Carefully ladle off the butter fat. You can take out some more milk solids by straining through a fine sieve or cheese cloth. Pouring carefully is also an option to consider. Discard what’s left on the bottom of the pan.

You will now have pure butter fat, a.k.a. clarified butter.

Store in an airtight container (to slow down oxidation). You can keep it in a cool dark place out of the fridge, but in the fridge works great. It keeps for quite a while. You can use it for sauteing and browning in all recipes that specify butter or a mixture of oil and butter for this.
Do you have any techniques you wished you had started to use earlier?


Ah, Ghee! The indian restaurants’ secret ingredient to make you wonder why it never tastes like that at home! Only it takes forever at home to go through this, but just wait til the fluffy naan bread comes out of the oven and spread it on. Good things come to those who wait!
LikeLike
I always felt the way you did. But I guess I need to try this also! 🙂 Thanks for posting.
LikeLike
With all that you do in the kitchen I am shocked that you had never clarified butter! Thanks for the reminder – I need to make some.
LikeLike
Great instructional post, Stefan. I really haven’t much use for clarified butter, so, I don’t make it that often. Still, with holidays fast approaching, it wouldn’t be a bad idea to make some so that its on-hand. Thanks for the reminder.
LikeLike
In southern Italy not a lot of butter is used (olive oil being the norm), but many recipes from the north use butter or a mixture of butter and olive oil for sauteing and panfrying. For instance the maiale in agrodolce I blogged about recently. I haven’t tried with clarified butter yet, but I bet it would brown more easily this way.
Le Marche is kind of in the middle, neither north nor south, but with all the olive trees there I am not surprised you are more of an olive oil guy 😉
LikeLike
Nice post, Stefan. In a commercial setting you use clarified butter all of the time but in home settings it’s quite different. As you point out, it is not difficult to do. It’s just a bother. I hardly ever make clarified butter and when I do it is almost exclusively for butter to use as a dip for crab or lobster. Nevertheless, the reward for your trouble is multifold. First, like you say, you get a higher smoke point enabling beautiful browning of things like tournedos, scallops, scallopini, etc. Second, and to me just as important, you get the actual flavor of the butter. Now that you have your clarified butter, if you want to try something, get a boneless, skinless chicken breast; season it with a little salt and pepper; bread it in bread crumbs from fresh bread, not stale or dried bread; and sauté it in the clarified butter. This is a remarkably simple technique with minimal seasoning but the flavor you will get with the butter and bread coupled with the moist chicken is mind boggling. Of course, the color of your breading will be beautiful and crisp.
LikeLike
Mmmm, thanks for reminding me that I should try making saltimbocca with clarified butter!
Your suggestion sounds interesting. How is the breading done? First flour, then beaten whole egg, then fresh bread crumbs? I’ve never used fresh bread crumbs for breading. I’m not even sure I know how to obtain crumbs from fresh bread, since bread starts crumbling once it’s dry?
LikeLike
I use the grating wheel on a food processor and it works very well. I also use a soft baguette. They say you should remove the crust but if the crust is soft, I don’t see that it makes much difference and I’ve done it both ways. No flour. Just egg wash and bread crumbs. Use a generous amount of breadcrumbs and press the chicken with the breadcrumbs to make sure they adhere. Let sit for 15 minutes or so. Put chicken in the heated clarified butter over medium/medium-low heat and let is sit undisturbed for 5 – 6 minutes or so. Flip and cook on the other side for 5 – 6 minutes or so. If you’re concerned about burning the breadcrumbs finish in the oven at 350 F.
LikeLike
Thanks, Richard. I will definitely try this.
LikeLike
Sorry Stefan, I spoke too soon. NOW I know….
LikeLike
🙂
LikeLike
I had no idea clarifying butter was this easy. Thank you for the tutorial! Your knowledge of food science is amazing. I even looked up Maillard reaction (what happens when amino acids react with sugars at elevated temperatures). Beurre noisette, ghee, clarified butter – it seems that every society has their version of a butter used for browning. This is one of my favorite entries – it is so easy to follow. Now, off to buy four sticks of butter, no less… Thank you for sharing!
LikeLike
I had no idea it was this easy before I tried it either. Ever since that first batch, I now always have it in my fridge and I use it for most of my browning and all recipes that call for butter to sauté.
LikeLike
I agree – it looks so easy – I am so glad you shared. I am sautéing some salmon tonight, and your clarified butter recipe will give the fish a nice brown color!
LikeLike
Hi Stefan,
Clarified Butter is great to use when I make delicate food, e.g. coquilles.
But where to use ghee? Same a clarified butter?
I have seen them by accident this weekend in a Moroccan butcher/groceries shop. Available in cans, origin seemed to be indeed Indian.
So need to buy one next time to make some tests…
Best regards,
Frans
P.S. Ever tried Inter Scaldes?
LikeLiked by 1 person
Hi Frans,
Ghee is the same as clarified butter, although sometimes it is a bit browned. Ghee is used in Indian cooking and I use it a lot to sear meat because it browns much better than oil. Making it yourself is cheaper than buying ghee.
https://stefangourmet.com/2014/12/23/dining-in-the-netherlands-inter-scaldes/
LikeLike