
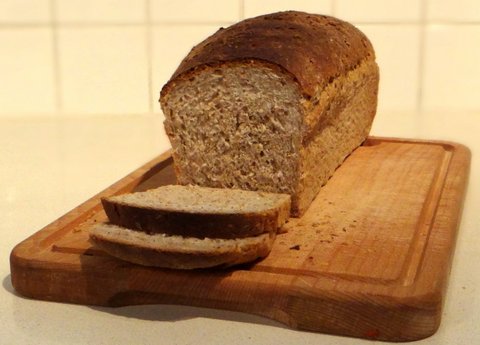
Baking your own bread is great. It tastes better, only has natural ingredients, and can be ready when you want it. It also means you can have fresh bread if there is no artisanal bakery near you. I haven’t bought any bread in years, and always bake my own. It’s great with a breadmaker, since I can set it before I go to sleep and then wake up with freshly baked bread. The only drawback is the shape and the hole in the bottom where the paddle is. Now that I have a stand mixer, it is also easy to make it without the breadmaker. You could of course also knead it by hand if you enjoy the exercise.
My favorite bread to eat for breakfast or lunch is multigrain. I prefer white bread for dinner because it has a more neutral taste, but the multigrain bread has more fiber and is therefore better for our health. Baking 100% wholewheat bread can be difficult as the bread will often turn out as a brick rather than rising properly. Even professional bakers sometimes have problems if they don’t use all kinds of chemicals to ‘improve’ the bread. There is however a very simple way to make it easier: simply add some white flour. This will give the dough a better structure, allowing it to rise more easily. Something else that helps is to put a container with water in the oven so there will be humidity for better heat conduction and thus the risen bread will ‘set’ before it can collapse into a brick. The bread flours I use are enriched with vitamin C, something else that helps the bread to rise more reliably. You can add some vitamin C powder or a crumbled vitamin C tablet to the dough for the same effect.
If you don’t have multigrain mixed flour you can also substitute this with more wholewheat flour.
Homemade bread goes stale more quickly than store-bought bread because it doesn’t contain all those preservatives. It is therefore best when eaten fresh, or the day after. If you are feeding a crowd, the recipe can easily be doubled, tripled or even quadrupled if your stand mixer and oven are big enough.
Ingredients
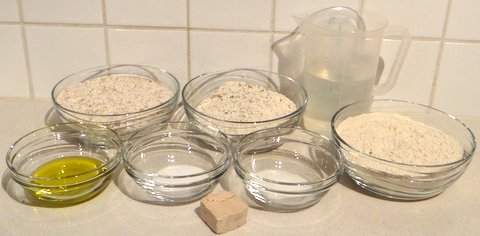
For one bread of 800 grams (1.76 lbs)
200 grams (7 oz) wholewheat flour
150 grams (5.3 oz) multigrain mixed flour
150 grams (5.3 oz) white bread flour
300 ml (1 1/4 cup) warm water (about 40C/105F)
10 grams (2 tsp) salt
15 grams (3 tsp) sugar
25 grams (2 Tbsp) olive oil or softened butter plus more for greasing the pan
20 grams (.7 oz) fresh yeast, or 7 grams (2 1/2 tsp or .25 oz) dry yeast
Preparation
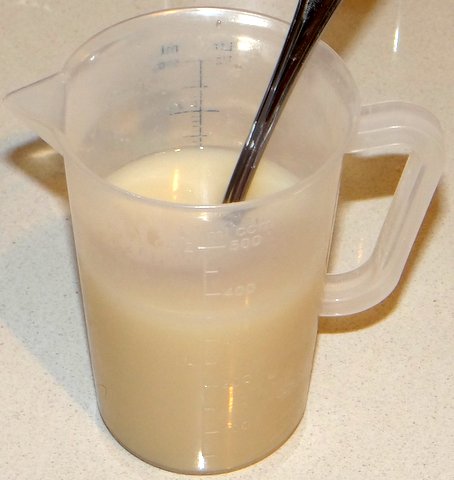
Crumble the fresh yeast into the water (or sprinkle the dry yeast into the water), add sugar, and stir with a fork. Set aside.

Add flours and salt to the bowl of the stand mixer fitted with the paddle attachment.
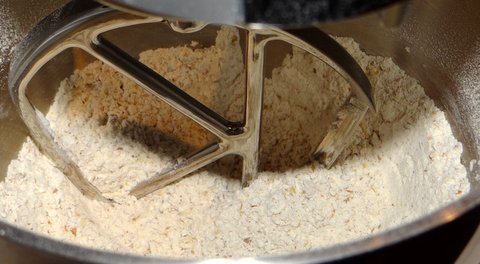
Mix on medium speed until homogeneous. (If you mix too fast, there will be flour all over the place.)
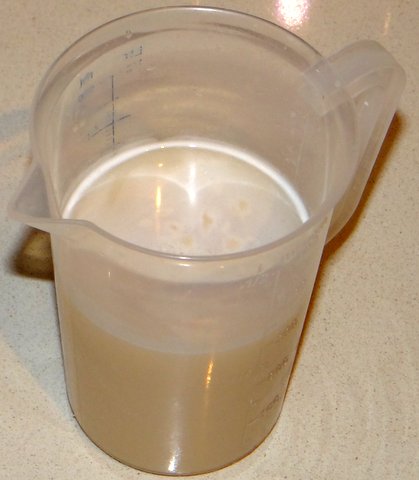
The water with the yeast should now be frothy on top. If not, the yeast is not working anymore and you should try again with other yeast.

Add the water with the yeast as well as the olive oil or butter to the mixture while the machine is running.

Mix on medium speed until all the flour has been incorporated into the dough.

Remove the paddle attachment, scraping off the dough with a spatula.
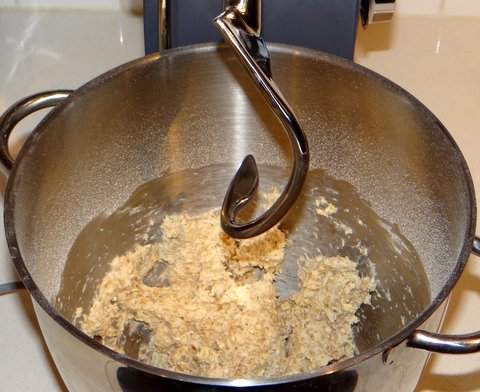
Fit the stand mixer with the dough hook.
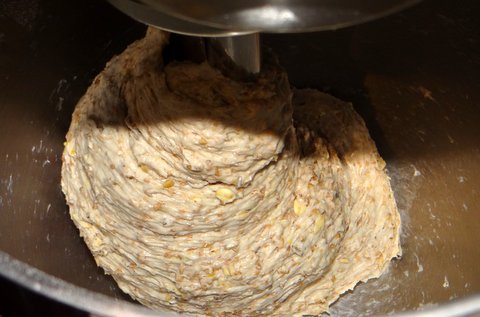
Let the stand mixer knead the dough on medium speed until the dough has completely gathered around the hook, about 10 minutes.

Scrape the dough off the hook with a spatula.
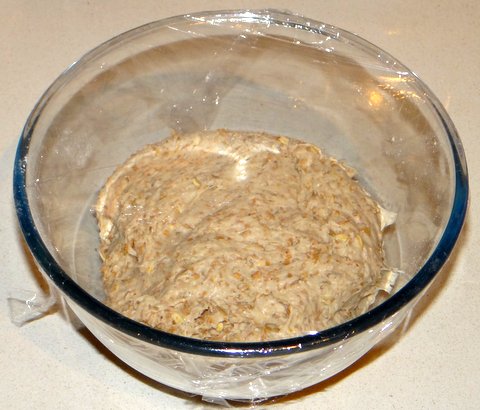
Cover the dough with plastic wrap (you can transfer the dough to a bowl or just use the bowl of the stand mixer) and allow to rise in a warm place. The oven with only the light turned on is a very good spot for this.

Allow the dough to rise until it has doubled in volume, about 1 hour (in summer or in the oven with the light turned on; in winter outside the oven it may take as long as 2 hours).
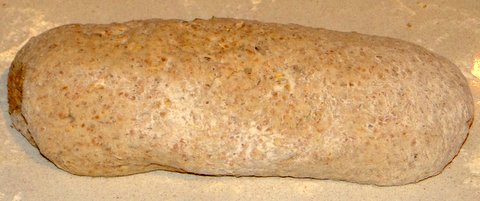
Knead the dough by hand to remove trapped air bubbles and to give it the shape of a loaf.
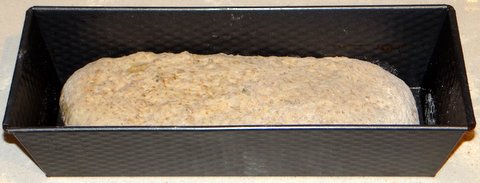
Grease a bread pan with butter or oil and put in the dough. You could also bake the bread directly on an oven sheet for a more ‘rustic’ look.

Cover the dough with a kitchen cloth and allow to rise for the second time (this is called ‘proofing’) until doubled in volume. Again the oven with the light turned on is a great spot and again this will take about 1 hour.

When the dough has risen properly, keep it covered by the kitchen cloth and preheat the oven to 250C/480F (making sure to remove the dough from the oven first if allowing to rise in the oven). Handle the dough carefully, as it may collapse otherwise.

Put the bread in the oven and put a container with about 250 ml (1 cup) of water in the oven as well. Lower the oven temperature to 225C/440F and bake for 30 minutes. Check towards the end to prevent the top from burning. The bread will sound hollow when you tap on the bottom when it’s done.

Take the bread out of the pan and allow it to cool on a wire rack. Taking it out of the pan will improve the crust that would otherwise stay soggy.

Don’t cut the bread before it has cooled down sufficiently (about 1 hour). If you cut the bread too soon, the texture will suffer.


That is a perfect loaf of bread. I love it. I will be making this bread tomorrow.
LikeLike
Thanks for the nice compliment 🙂
LikeLike
That’s an excellent looking loaf. We have a bread maker too but since the first few times we just use it to make the dough and then transfer the dough to a bread pan for baking.
LikeLike
Thanks! That’s what I often do too. The breadmaker can’t be beat for producing fresh bread for breakfast though.
LikeLike
It’s been a while since I baked bread, Stefan, and I’ve never tried whole grain. My experiments with whole wheat loaves weren’t the best so I stuck to what I did best. Your loaf, though, looks so very good. I definitely need to start baking bread again but, this time, follow your lead and try baking a whole grain loaf. If mine looks half as good as yours does, I’ll be quite satisfied.
LikeLike
Thanks for the nice compliment, John. I’ve recently had another ‘brick’ experience when I tried to do a 100% wholewheat loaf, but so far I’ve always had success with adding 20-25% white flour. Buona fortuna!
LikeLike
Sorry had to say it – have you thought about moving to sourdough bread? Would go with the other recipes & ethos – much better for you, quality taste – however it does take a bit more planning!!!
LikeLike
I have thought about it and so far I’ve drawn the line at cold fermentation (https://stefangourmet.com/2012/08/03/cold-fermented-pizza-dough/).
LikeLike
The sourdough bread you have as a gravatar looks great btw.
I noticed your blog is basically empty. Are you planning on blogging at all?
LikeLike
I enjoy baking bread and appreciate the tip for adding water to the bottom of the oven! I’ll have to try that. Your loaf is beautiful. 🙂
LikeLike
Hallo Stefan, Allereerst bedankt voor zo’n rijke inspiratie bron, waarvan ik veelvuldig gebruik. Ook dit brood is weer heel lekker, maar ik krijg het brood niet zoals op de foto. Ik heb nu een vijftal broden gebakken. Twee kwamen niet hoger dan de helft van het bakblik de drie andere kwamen tot de rand van het bakblik. Ik gebruik zo’n zelfde blik als op de foto. Overigens geven volkoren speltbroden geen probleem. De oorzaak zou de meel kunnen zijn. Dus nu mijn vraag: welke meel merken gebruik je voor dit brood? Ik gebruik meel van Molen de Roos uit Delft.
Bij voorbaat dank voor je reactie.
Vrgr Paul
LikeLike
Beste Paul,
Voor dit brood heb ik gebruik gemaakt van meel van het merk Soubry.
Wat je ook kunt proberen, is een theelepel suiker toevoegen.
Hartelijke groet,
Stefan
LikeLike
Beste Stefan,
Bedankt voor je reactie. Dat zal met deze melen zeker gaan lukken. Als ik de ingrediëntenlijst goed begrijp dan zijn er er reeds ingrediënten om te verbeteren en/of te verrijken, zoals vitamine C, enzymen en extra gluten, aan toegevoegd. Deze toevoegingen en verrijkingen ontbreken in de melen die ik gebruik. Ik ga het in het weekend met de Soubry melen proberen.
Hartelijke groeten,
Paul
LikeLiked by 1 person
Hallo Stefan,
Inmiddels heb ik vier broden met de Soubry melen gemaakt. Ze smaken erg lekker en zijn voldoende gerezen. Experiment geslaagd. Bedankt.
Groeten, Paul
LikeLiked by 1 person